Showing posts with label decorating. Show all posts

Thursday, October 14, 2010

thrifty thursday - front porch decor

Yes, thrifty thursday is back! I know, y'all didn't know what to do with yourselves these last couple weeks it was missing. yeah right

I thought I'd show you my recent front porch decor...thrifter style. I have a small front porch. But it's big enough to put a few things out there to decorate and make it look pretty.
I'd been on the lookout for an old, rickety chair that looked weathered & worn. And wouldn't you know it, I found one just the other day! By the way, I also got to meet a new friend I met through this blog...hi Jen :) Anyway, it looks like it's falling apart, the wood is cracked, the paint is peeling...perfect!
On the chair I have an old crate that I picked up at Gina's a while back. It was on top of my kitchen cabinets along with some other thrifty finds. But it found a new home holding some fall mums. 

And, of course, my pup and a pumpkin. Now I just need to get a Halloween wreath on my door & my porch will be done!
Photobucket

Friday, September 17, 2010

summer burlap wreath revisited

It's time to change up the decor again. Time for pumpkins & pumpkin spice candles (mmm!!), crunchy leaves, gourds, and...fall wreaths. But before I take my summer wreath down, I thought I'd show you how it has 'aged' over the past 7 months. 

So here's what it looked like back in February...
And check out how it looks now after several months on my front door... 
See how the burlap has changed color? And how it has curled up a little?? Not sure what made it change color but I LOVE it :) I love how it still looks pretty but doesn't look so 'brand new' anymore.

And now Mr. Summer Burlap Wreath, it's time for you to retire until next year...

By the way, I've been working on some fun Fall/Halloween goodies for my etsy shop. Here's one of the wreaths I've finished up and is in the shop right now:
Edited to add - this wreath has already sold out 
but I'll have more in the shop soon!!
Just a whimsical, fun little Halloween wreath :) I'm also working on some wooden signs and hopefully we'll get the rest of them cut this weekend. Or, I should say, my husband will get them cut this weekend so I can get them painted!

Have a great weekend everyone!!
Photobucket

Thursday, August 19, 2010

new in the shop!


I've been working on some fun stuff for the shop that I'm really excited to share! I like to dabble in all kinds of craftiness...sewing, scrapbooking, home decor, etc. So when I opened up 24 Olive Street I had intentions on sharing a little bit of all of that.

So here's a few fun things that are new to the shop:
I am in love with these fun little tea towels that I've been working on. This fabric just speaks to me in my favorite color combination. And what better use for that key lime basket than for some cute towels?! There is a listing for the basket with towels along with a separate listing for just the towels. But I only have 2 baskets so once they're gone, they're gone!

I also made this cute quilted purse from those same wonderful fabrics:


This purse is a made to order item ~ meaning, it will be crafted after time of purchase. Wait time is 5-7 days (but usually less than that).

And remember this 2 tier metal stand??
Well I found another one!! So, you guessed it, I gave it a new coat of key lime green paint and it's in the shop!

I may have a small addiction to key lime green paint right now :)

There are many camera straps in fun bright colors

Do you remember this printer's tray summer photo collage I made a couple months back??

Well, I'm so excited that I managed to snag up a few more of these great trays while on my thrifting trips, so I put together a few kits. And each one will be different. I've already sold the large kit but there's still 2 smaller printer's tray kits left.

I love collecting vintage books, cards, etc and I'll be putting together listings for some fun goodies..

If you haven't joined my facebook page, head over here. When we hit 100 people who 'like' the shop I'll be doing a giveaway. Hint - the giveaway won't be anything that's in the shop right now. I'm working on what that will be and I'll post pics soon!
Photobucket

Friday, May 14, 2010

priceless artwork

***Edited to add ~ the frame sizes are 14x18 and the photo opening is 8x10. I wanted to make sure the photo opening wasn't larger than that because that's the largest size my printer will print on***
 
I've spent the last almost-4 1/2yrs in our home trying to figure out how to decorate the walls. Especially the walls of our living room. Because it's a big rectangle. No fireplace to break it up (our fireplace is in the kitchen). One entire length of the room is open to the foyer and dining room. Which I love by the way. Opposite that wall is a doorwall that breaks up the space a bit and I've finally got that decorated (which I'll share in another post). 


So that leaves the other two "shorter" walls. One side has an armoire with our tv in it. The opposite wall has our big, green, over sized, oh-so-comfy couch. I know the over sized couch look is going out of style. Is there really a "style" in decorating anymore?? Anyway, there's no money for a new living room furniture right now and quite honestly I loove sitting on it. We fell in love with it the first time we sat in it in the furniture store 9 yrs ago. And it's held up really well. And it's green...my favorite color :)


Ok, I know you guys so didn't want to hear a story about my living room furniture! I digress...


On to the artwork...


I've struggled with what to put over the couch. This is how it looked when we first moved in
I know, blah right. I had those pictures from our last house. And I hated that there was nothing on the wall above the couch so I put those up. And hated them until the moment I took them down. And I also hated that table. I replaced it with this.


Then I did a monogram wall 
I thought I had a pic of it before I took everything down. But I didn't. I loved the monogram wall (you might remember I did one in my daughter's room here). I loved all of the pieces together but hated it over my couch. Why?? My couch was too big in comparison to the pieces I had hanging over it. The couch is big so I need to have bigger frames, bigger pieces hanging above it.


Finally, this is what I came up with a couple weeks ago and I love it.
Priceless artwork courtesy of my daughter :)


I took her artwork from art class, scanned it, then cropped it to 8x10, printed it on photo paper and Voila!! Now, the only reason my son doesn't have artwork displayed in our gallery is because this is his first year at the "big" school and I haven't gotten his artwork folder home yet (we get a big folder home at the end of the year). So after next week I'll add his and any new stuff Olivia might have.

Pictures are a bit crooked cause I always put a pillow up on the back of the couch. But I'm really liking what I have up there right now. And her artwork adds a lot of color to the wall.
The iron thingie above it I got at Hobby Lobby on sale for 10 or 15 bucks.
Now I just need to make some cute pillows to go on my couch and we'll be all set. On to the next decorating dilemma...and my treasures I found thrift shopping this week! I'll share those this weekend.

Photobucket

Friday, February 12, 2010

no school boo hoo

We got a call yesterday at about 4:30pm ~ school was closed for Friday due to the *threat* of snow. Yes, I said canceled due to the threat of snow. I find that hilarious being that I grew up in Michigan and lived there til I was 30. Which was just last year by the way! HA! I get that we don't have the infrastructure to deal with snow or ice so I get it but it still cracks me up!

The snow did make it's way here and we're anxiously awaiting for some of it to stick so we can go outside and play in it. They're saying 2-4" with a little more in some areas. I don't think it'll be like last year but we can hope!! This is what it's looking like right now...
And this old man used to love playing in the snow when he was a bit younger...
Anyway, as much as we love an extra day off school we were all a little bummed because we were supposed to have the kids' Valentine's Day parties today. They have winter break Monday and Tuesday so they won't be back to school til next Wednesday. And I had just made about 50 popcorn balls. Ugh... well, I hope they'll keep til next week!! 

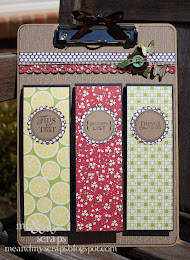
So I thought I'd share a few of the Valentine treats that I made this week. I planned to make a bit more but after school was canceled I held off.

Some Valentine suckers...
I just took those heart shaped suckers that are sold in the long row of 12 (you know the kind) and punches some scalloped circles & circles & attached with glue dots and added some ribbon. 
I also made some yummy jello popcorn balls...
Like my fancy bowl?? hehe I found the recipe here (recipe to follow at the end) and decided to package them up like she did with some cute Valentine's cupcake liners. I did 2 batches and managed to get about 25 out of each batch. That's making the small ones. Obviously if you made bigger ones you'd probably get half. I used cherry jello and one 3oz. pkg of jello was enough for 2 batches.
Now, I was not meticulous in making them super round. They're going to 6 & 8 yr olds... My kids loooooved them and keep asking for more every day :) This will definitely be a recipe that gets repeated in this house!

And off the subject of treats, I found a new spot for my Valentine's burlap wreath
It was really hard to get a good angle for a pictures so that a) you couldn't see me in the photo, and b) you couldn't see all the clothes piled up on my chair! I found the mirror at Walmart for 30 bucks. Looks like wrought iron, doesn't it? I think it's actually plastic which may account for the price. That makes it good for hanging in my foyer because behind that wall is a pocket door. And we discovered the hard way that if a nail or screw is in too far into the wall it will scratch up the door
Like I said, we learn things the hard way in this house. So we have to be careful when hanging something heavy on that wall.
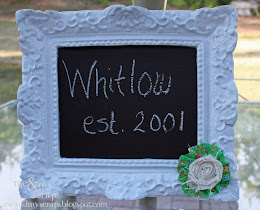
Also, my friend Carol came over the other day and made a couple of the marble frames. Aren't they cute?!
I like how she did the 'X'!

So while we wait for the snow to pile up enough to play in, we have a fire in the fireplace, kids are playing in the living room, and we'll be making some Valentine luminaries. And maybe we'll have some hot chocolate, too :)
****************************************************************
 Jello-O Popcorn Balls

Ingredients
3 quarts of popped popcorn (approx. 12 cups)
6 tablespoons butter
3 cups miniature marshmallows
3 tablespoons of dry Jell-O

Melt butter over medium heat in a large pot. When butter is almost completely melted add marshmallows. Once marshmallows are melted add dry Jell-O. Mix in well, Take off burner and add popped popcorn. Stir well to coat popcorn. 

My notes: I actually had the popcorn in a big bowl and poured the butter/marshmallow mixture on top, then mixed it all in. I used a large cookie scoop sprayed with Pam and used my other hand to form it into a ball in the scoop, then placed them on cookie sheets.

You really need to try them. Your kids will love them!
Photobucket

Friday, February 5, 2010

love is in the air

And I'm not talking about the fact that my hubby comes home from out of town today ;) Nope, I have some Valentine's Day decor to share with you! I never used to decorate for any other holiday except for Christmas really. It's amazing what having kids does to you. You feel the need (and get super excited about) celebrating everything!

First here's some frames made from inspiration from tater tots and jello (again!)
paper ~ Martha Stewarts, marbles ~ Hobby Lobby, adhesive ~ E6000
 
Super inexpensive decoration to make. My fave! You can click here to see how she did it...
I would like to add that if you use that E6000 glue (which I did) then be sure to either put it on top of a napkin as you're doing your project or replace the cap every time you squeeze some out. My kept oozing out.

Check it out, look what they look like when the sun hits them in the afternoon...
Cool, huh?! I also made a heart one for my mantle
It's really hard to get good pics on my kitchen...lots of indirect light. But oh how I love red decorations against my sage green walls. (technically, the paint is called Crocodile Tears by Olympic, bought at Lowes. I am in love with this color). In. Love. Ever have a paint color like that?? Like, every time you walk in the room it makes you happy?? Yeah, that's how I feel when I walk in my kitchen.

Back to decorating... Here's another pic from my mantle
Notice I have another burlap wreath up there. I'm finding myself running around the house, looking for things to wrap in burlap. It's a sickness really...


What I would really like is a big rectangular mirror over my mantle. Then I could hang the wreath in front of it. But, don't have one of those. So, you make do right? At first I was going to hang it up
I certainly didn't want to put it on the front door cause then I'd have to take this one down! And I would like to string the word "love" in the middle but I didn't have time to do that. Maybe that'll get done, maybe it won't.

I have 2 more decor project to finish, then on to class treats this weekend (after finishing my son's Star Wars cake...I really didn't plan my children very well, so close to too many holidays!)
Photobucket

Friday, January 29, 2010

monogrammed walls

This is a post I've been meaning to do for quite a while now. Several months back I saw on a few blogs how people have been doing a monogrammed wall using various letter shapes along with other pieces of artwork, photos, etc. I thought that was such a neat idea so I thought I'd try it out in my house.

I actually did 2 monogram walls but I'm planning on redoing one of them. So I'll show you my daughter's room today and the other one when it's redone (so I can show you a before & after). We repainted her room several months back to this really cute purple color. I'm still working on decorating it all up. And right now she has a double bed in there which I'm hoping to switch out within a few months with a twin bed.

Anyway, here's her monogrammed wall:
To create this I kept an eye out for a few O's (notice the pink & white striped plate ~ that's an O!) and a few odds & ends. I layed them all out on the floor til I got the grouping right and Voila! I'm really happy with how it turned out...and she likes it, too :) The best part? It was very inexpensive to create. I'll show you:
1 ~ reg. $11.99, on sale at Hobby Lobby for 1/2 off
2,3 ~ frames I had at home, painted them white with spray paint ($1 a can at Walmart)
4 ~ Found at Hobby Lobby on clearance for a couple bucks
5 ~ cross my daughter made in Sunday school a couple years back
6 ~ one of those paper mache letters, painted it white then adhered some Scenic Route paper I had with mod podge. The birdie was made by my father in-law, it actually was attached to a branch but fell off and now looks perfect perched in the O!
7 ~ another one of those paper mache O's. this time I added some flowers & bling from my stash after painting it white
8 ~ cute plate from Hobby Lobby, reg. $9.99 on sale for 1/2 off
9 ~ found on clearance for a couple bucks at Hobby Lobby
10,11 ~ both a few bucks on sale at, you guessed it, Hobby Lobby!
12 ~ found just the other day on sale for a couple bucks at Joann's, 60% off.

So that's it. Easy peasy lemon squeezy! I'll share the rest of her room once it's finished. It's quite cute :) Check out the butterflies I just hung up in there...
Wanna guess where I found those?! hehe, and they were about 5 bucks for all of them!
Photobucket

Wednesday, December 2, 2009

easy holiday table decoration

This year with my daughter being sick for so long, I didn't have time to do a lot of decorating for Thanksgiving. Scratch that, I had no time for decorating. I saw an easy centerpiece on one of my favorite sites ~ Nesting Place ~ and I figured I could pull something off like that. 

Now, mine was a lot more simpler than hers. I used a smaller platter. Actually, I found this square white dish at Kohl's for 4 bucks. I added some candles & the pumpkin that I already had at home along with some nuts and a simple table centerpiece was created :)
 

Now that turkey day is over, I changed it up for Christmas. Again, I kept is super simple since this is sitting on my kitchen table and I wanted it to be casual. Plus, we also have an advent wreath on that table, too. 

I thought about changing out the nuts with pine cones, but we all enjoy cracking open some nuts after dinner so I left it as is. Still looks cute I think :)
Photobucket
Blog Widget by LinkWithin