Showing posts with label stamping. Show all posts

Sunday, March 14, 2010

more Jillibean Soup

Yes, I have more Jillibean Soup projects to share :) I told you I got some fun goodies last weekend! Plus, I'm submitting my projects to their DT call. I know it's a long shot...there's a lot of great talent out there. And even though I don't think I have a huge shot of getting one of those coveted spots, I figure you can't get anything unless your try, right?! I still have a few projects I'm working on and then I can figure out which ones to send to JS.


Here's a few layouts I created:

As soon as I saw those cute piggies I knew what layout I wanted to do. We're always calling my daughter's guinea pig "little piggy" so it was fitting.
I cut out the little piggies and popped them up to add some dimension on the page. And since there wasn't much room for journaling I simply wrote around the outside of the layout...something I end up doing a lot since I don't really think about where I'm going to put journaling until the page is pretty much completed.

Another layout of my daughter. I actually took these pictures at the movies on Friday. We came out and it was pouring down rain. So while we were waiting for the rain to let up a little (so we wouldn't get totally drenched) I took some pics. They ended up being perfect for this layout.
Added some butterflies (so loving butterflies lately!) and the title and scallop circle were cut with my Silhouette.

And some cards...
The little birdie punch is from Stampin' Up.
I used a journaling sprout for the center, red scallops are punched with a circle scallop punch, and the 'thank you' stamp is Stampin' Up. 

This next card I used my new 'Everyday Button Bits' stamp set from Papertrey. I'd been eying that stamp set for a while...finally broke down and bought it :) The little cherries go great with that cherry paper.

Circle & scallop circle were cut with Spellbinders dies. I also used the Swiss Dot Cuttlebug embossing folder.


I also created a layout for their sketch challenge, so I'll share that tomorrow. Have a wonderful Sunday friends :)
Photobucket

Friday, March 12, 2010

altered clipboards...Jillibean Soup style

While at my scrappin' retreat last weekend I managed to snag up some new Jillibean Soup papers...hands down one of my absolute favorite companies. Then, when I got home from my weekend, there was a box of goodies waiting for me. Double bonus!!


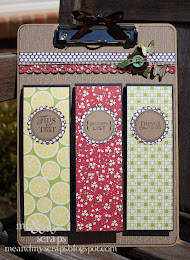
Anyway, I've been wanting to make some altered clipboards for a while now. And I finally got a chance to do that this week. I wanted to make more than just a clipboard to make it more useful for my needs. So this is what I came up with:
I covered the clipboard in the JS paper, inking the edges first. Originally I was going to cover the entire thing in Mod Podge but then ended up skipping that because I liked the way it looked. I will tell you that I was very generous with the adhesive though. The clipboard was longer than 12", so I actually cut about 2" from the top and left a gap between the top and bottom pieces. That's where I ended up adding the other strips of paper.
I had some leftover magnets from another project so I used those to hold the notepads (from Papertrey) in place. That way, when I'm done with a notebook I can create another one to put in it's place.
You can see that the cardstock was cut to fit around the top of the notepad and comes down about another 2" in the back. I simply measured the notebook and made 2 score marks to fit around the top. The front was stamped with the 'Take Note' stamp set from Papertrey in brown StazOn.
Then I simply embellished the top of the clipboard and it was finished! I'm really loving that Martha Stewart butterfly punch lately. So cute!


Now, my daughter saw what I was doing and requested one for herself (of course!). So I used the new Easter papers to create hers...
You might notice that the notepads are a bit skinnier. For hers I used some leftover notepads that I had cut myself for a different project. After making hers I think I like the wider notepads better (but she's 8, she doesn't mind!)
These notepads were also thicker and the paper didn't want to lay flat like on mine. But that's ok.
Aren't those little bunnies cute?! Olivia loved them :)

She wanted one notebook that she could list her books to read so the stamp set worked out perfect for that. She was very happy with it...can you tell?!
She's a big reason why I love crafting. The look of excitement on her face when I make something for her...just priceless!

And as you can see she's making very good use of her notebooks...
Do you like the "tatoo" on her arm that my son gave her?? My son has one on his arm, too :) And based on her clothing choices I think she's trying to match her notepads. Hmmm....

Any questions on how I made this, just leave a comment!
Photobucket

Monday, November 23, 2009

Delightful Decorations

This is one of the cards that I worked on a couple weeks back. I've been waiting to play with this new stamp set (Delightful Decorations) for a while. When I originally ordered it I mistakenly ordered the spanish version. Aaaarrgghhh.... So I had to wait to send it back and get a new one. But I love that there's a matching punch for this set. Makes things a whoooole lot easier.

Other supplies used: Jillibean Soup papers, Martha Stewart punch

I used the snowflake embossing folder along with some baker's twine. And don't forget the stickles to make the snowflakes sparkle and some green crystals!

Photobucket

Friday, September 25, 2009

3 months...

til Christmas!!!!

Are you ready?? I've already been thinking about many projects I want to get done for, not only christmas, but Halloween & Fall in general. I managed to squeeze in some early Christmas shopping at Toys R Us today. And I've stored away a few toys that I bought last year. My goal every year is to be pretty much done shopping before December starts. That way I can actually enjoy the season and all that it's about without having to worry about battling the crowds to shop for last minute gifts.

Plus, all of our family live in other states so that means shipping things out. And let me tell you, you do NOT want to go to the post office in December if you don't have to!!! 

And in preparing for the holidays I've not only been thinking about what to get my kids & our family for Christmas but things like:  what our Christmas card will look like this year, teacher gifts, classroom gifts, decorations, etc.

I did this card last week when the holiday spirit hit me.


I stamped the bird out separately, cut it out and then used pop dots to make it stand out. The heart was punched with my SU heart punch. And I'm loving my new Martha Stewart punch. I also used green stickles to make the wreath stand out more a bit.


Photobucket

Wednesday, August 26, 2009

gearing up for fall & a giveaway!

The kids are back in school. The stores are filled with fall (and Christmas ~ eek!!) decorations. Of course, it's still in the 90's here and definitely not fall weather yet. But nonetheless I've been in the mood to create some fall goodies.

Check out some of my creations....

If you have the most recent Stampin' Up! catalog, then these jars might look a little familiar. I did my own take of the ones shown on p.20. I bought the jars at Hobby Lobby on sale, paid less than $10 total for both. Click on the image to see the larger jar...some of the rub-ons are hard to see with the black licorice!

I used the rub-ons on multiple colors of cardstock, then cut and layered with SU dimensionals for a neat effect. You could achieve the same effect with stamping if you wanted. One other thing...I use glue dots when decorating these jars. That way, when the season is over you can remove your decorations and change it for the next holiday!

More rub-ons...I found the green jar at Hobby Lobby on sale for around $3. Each pkg of rub-ons come with 1 sheet of black and 1 sheet of white. So I used the white ones on that cute little black bucket I found a while back at the Target dollar spot. Don't you love that Target has that?!

Again, I used the rub-ons twice. Used one directly on the bottle and did another one on white cardstock, cut out the skull (ewww, that sounds gross!) and attached with SU dimensionals.

The little "Oct 31" jar is one of those Making Memories embellishment jars (sorry, can't find a link of anyone who has some but they're the ones that are sold in a pkg of 6).

More altered goodies. The "halloween" tin is a band-aid tin that I decorated with the new Cast-a-Spell DS papers, white rub-ons and pumpkin pie striped grosgrain ribbon. Love ALL of the new striped grosgrain ribbon!

Pillow boxes...love the pillow boxes. And if you tie your ribbon sideways it holds it closed and you don't have to use adhesive on the ends!

I hope this inspired you to start crafting some ghoulish goodies!!

Click here to place an order


And here's the fun part ~ leave a comment and I'll pick one person to get a few Halloween goodies! US only, sorry! I'll keep it open til Friday at midnight :)
Photobucket

Friday, May 22, 2009

teacher gifts

School is officially out for summer!!! It's been a crazy week with soccer, dance and gymnastics all ending along with the last week of school. We also had my son's pre-K graduation last night which was *so* cute. I managed to make it through the night without crying (I started to tear up a little but I made it stop!)

Before I share some of the school pics, I thought I'd share the teacher gifts that I made this year. Maybe some of you who still have kids in school can find some inspiration from them :)

Here's what each of the teachers and parapro's got from the kids:

The buckets I found at Target in the dollar section (don't you LOVE that they added that section to the store???) Added some red grosgrain ribbon (Stampin' Up).

Here's what's inside:

Post-it note books made with 4x4 square coasters that I picked up here (but you could easily use chipboard). Paper is Summer Picnic (retired) from SU!. Stamp set is Tart & Tangy (perfect for teacher gifts and summer projects!!) And it's held together using my Bind-it-all.

I adhered the paper with Elmer's craft bond glue stick. I use a glue stick with projects like this to make sure the paper's not going to come off. Hobby Lobby sells it for $1.99 and it really works. When it was dry I sanded the edges (away from the paper) to give a nice finish and to keep the paper from lifting up.

Small decorated legal pads, these ones are 5x8 (12 for $6 at Staples). Unfortunately they didn't fit in the buckets. I was looking for smaller ones but couldn't find them. I got the idea for decorating them on Becky Higgins' blog recently (5/12 post). And who can't use an extra notebook?

Altered jumbo paperclips (6 for $1 at Walmart):

(they're decorated front and back)

Gift card holders:

These ones are similar to the ones in this post. I didn't have time to do stitching on each one so instead I used a staple on each side to hold the ribbon on and it helped hold the gift card closed as well (and it looks cute!).

And a little card that my kids filled out for each of their teachers:

I found some inexpensive gift bags at Walmart and put each bucket and notebook inside the gift bag. That way it was easier to transport them to school.

I also made up a few extra notebooks and post-it note books to give to the principal, asst principal & nurse (because my child visits the nurse a lot!). What was great about all of these projects is that I was able to use up all of my scraps I had leftover from this paper pack! And most of the supplies I had on hand.

That's it for now :)

Tuesday, May 5, 2009

NSD pics

Ok, on to National Scrapbook Day. I mentioned earlier that I had a crop at my house.

We scrapped. We ate. We talked. We laughed. We played a few games. We ate some more. Good times were had by all! I had a lot of fun. Thanks for coming over guys!!

Strawberry Cheesecake trifle anyone???
(this recipe was in the latest Kraft foods mag, super yummy and super easy)


notice there's more pudding/cool whip & cake than fruit? yeah, that wasn't an accident ;)

I'll share a few of my creations later but for now I'll share a few of the goodies that I gave to the girls. {BTW, those of you that didn't come, we missed you! coughcoughSusanStaceycoughcough}

Anyway, I put together these little gift buckets for the girls
A handmade card, post-it note holder & a couple gift tags. The buckets came from the dollar section at Target, tags from Staples.

I used the Forest Friends stamp set that's new in the Stampin' Up! mini-catalog. *Love* that set. How could you not love those cute little animals?? They remind me of Bambi & Thumper :)

Here's a closer look at the post-it note holder

Got the idea on Chic 'n Scratch's blog. I used kraft cardstock and embossed it with the Cuttlebug Stylized flowers embossing folder. I think I'm addicted to kraft cardstock. I may need an intervention soon.

but I digress...

Another gift


Carol won this when we played bingo :)

I found the pot (again) in the Target dollar section, added some white acrylic paint to give some texture and then decorated with flowers, a cute brad and a butterfly!

And as my son would say "Woila, there you go!"

Simple but cute gifts. And sometimes simple is good. I'm planning on making similar gift buckets for the end-of-year teacher gifts. My kids have less than 3 weeks of school left so I need to get moving on those!

I hope that satisfied the curiosity of my nosy blog stalker people! hehe (and you know who you are!)
Blog Widget by LinkWithin