
 The project ideas have been updated for August on the Kraft Girl Kits website. You can check them all out here. I posted the instructions on how to make the altered flower pot using this month's kit.
 You'll need a flower pot or jar (I found mine in the dollar section at Target). You'll also need some wooden sticks & styrofoam.
1) Use a couple glue dots to hold the wooden stick on one of the paper whimsies. Then place some foam pop dots on either side of the stick. I had to double up on mine since the wooden sticks were so thick.
2) Place the other flower on top so that you have a front and back to your flowers.
3) With the bingo card I actually placed the foam dots on the front side of the flower because I wanted it peeking out from behind the bingo card.
4) With the other flowers I used a flower punch for the back.
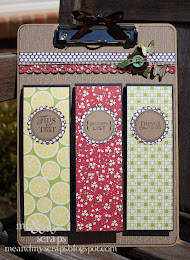
5) Use circle punches to punch out pictures and place them on the paper whimsies along with other accents. I used a scallop circle punch, butterfly punch, Stickles, buttons & string to accent my flowers.
6) To make the "grass", cut very thin strips of patterned paper (this is great for using up leftover scraps)
7) Grab small handfuls of the strips of paper & crumple up. The more you crumple, the better it looks (my kids like to help with this step!) Place the styrofoam in the bottom of the pot (you can adhere it to the bottom with a little glue or glue dots if you want to keep it stable) and then place the "grass" in the flower pot. Put your "flowers" in (be sure to hold them by the stick when placing in the pot, not the photos because you risk damaging them)
8) Decorate the flower pot. For mine I simply used the decorative strip on the Sassafras paper along with the red pom pom trim held on with small glue dots. You could also brush some paint along the pot if you wanted. I kept this one pretty simple!
Be sure and check out the other project ideas for this month!


1 comment:
I love this project, it's so adorable!
Post a Comment